Posted on Leave a comment

Raspberry Pi Pico W as Bluetooth Low Energy Central Device and Peripheral Device

This is a very simple demonstration of the Unsecured Bluetooth Low Energy technology.

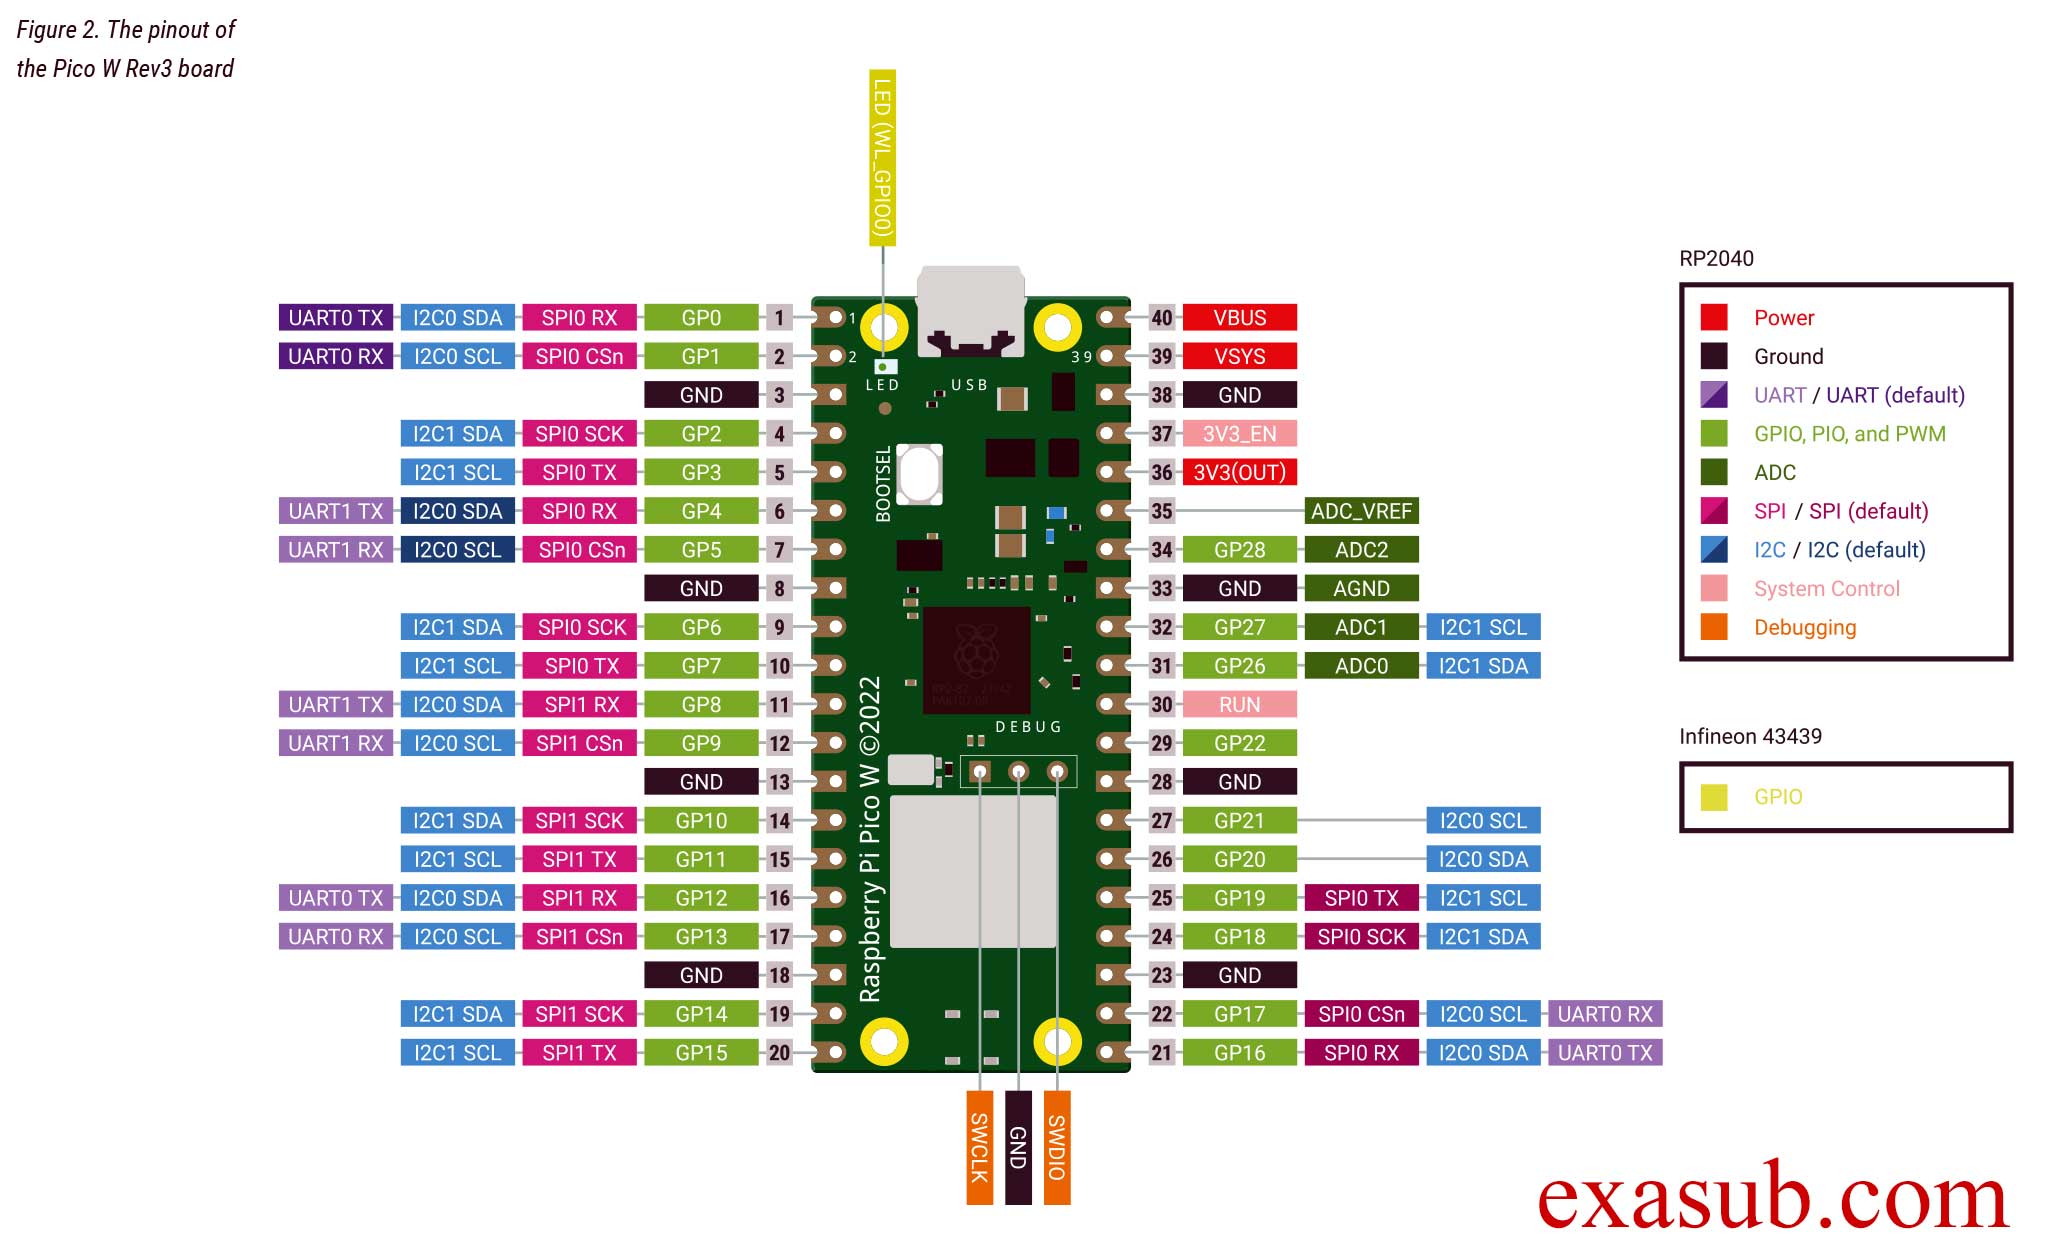
I am using two Raspberry Pi Pico W for this.
One will be operated in Central Role and the other will be in the Peripheral Role.

The peripheral device will advertise the temperature data of the rp2040 chip.

The Central device will scan the surrounding and connect to the peripheral device to receive the temperature data.
The central device does not use any passcode or pairing methods to connect to the peripheral device.

Note: You will need ble_advertising.py
You can check the code How to use Bluetooth LE of Raspberry Pi Pico W using MicroPython

ble_Central_device.py
# This example finds and connects to a peripheral running the
# UART service (e.g. ble_simple_peripheral.py).

import bluetooth
import random
import struct
import time
import micropython

from ble_advertising import decode_services, decode_name

from micropython import const

_IRQ_CENTRAL_CONNECT = const(1)
_IRQ_CENTRAL_DISCONNECT = const(2)
_IRQ_GATTS_WRITE = const(3)
_IRQ_GATTS_READ_REQUEST = const(4)
_IRQ_SCAN_RESULT = const(5)
_IRQ_SCAN_DONE = const(6)
_IRQ_PERIPHERAL_CONNECT = const(7)
_IRQ_PERIPHERAL_DISCONNECT = const(8)
_IRQ_GATTC_SERVICE_RESULT = const(9)
_IRQ_GATTC_SERVICE_DONE = const(10)
_IRQ_GATTC_CHARACTERISTIC_RESULT = const(11)
_IRQ_GATTC_CHARACTERISTIC_DONE = const(12)
_IRQ_GATTC_DESCRIPTOR_RESULT = const(13)
_IRQ_GATTC_DESCRIPTOR_DONE = const(14)
_IRQ_GATTC_READ_RESULT = const(15)
_IRQ_GATTC_READ_DONE = const(16)
_IRQ_GATTC_WRITE_DONE = const(17)
_IRQ_GATTC_NOTIFY = const(18)
_IRQ_GATTC_INDICATE = const(19)

_ADV_IND = const(0x00)
_ADV_DIRECT_IND = const(0x01)
_ADV_SCAN_IND = const(0x02)
_ADV_NONCONN_IND = const(0x03)

_UART_SERVICE_UUID = bluetooth.UUID("6E400001-B5A3-F393-E0A9-E50E24DCCA9E")
_UART_RX_CHAR_UUID = bluetooth.UUID("6E400002-B5A3-F393-E0A9-E50E24DCCA9E")
_UART_TX_CHAR_UUID = bluetooth.UUID("6E400003-B5A3-F393-E0A9-E50E24DCCA9E")


class BLESimpleCentral:
    def __init__(self, ble):
        self._ble = ble
        self._ble.active(True)
        self._ble.irq(self._irq)

        self._reset()

    def _reset(self):
        # Cached name and address from a successful scan.
        self._name = None
        self._addr_type = None
        self._addr = None

        # Callbacks for completion of various operations.
        # These reset back to None after being invoked.
        self._scan_callback = None
        self._conn_callback = None
        self._read_callback = None

        # Persistent callback for when new data is notified from the device.
        self._notify_callback = None

        # Connected device.
        self._conn_handle = None
        self._start_handle = None
        self._end_handle = None
        self._tx_handle = None
        self._rx_handle = None

    def _irq(self, event, data):
        if event == _IRQ_SCAN_RESULT:
            addr_type, addr, adv_type, rssi, adv_data = data
            if adv_type in (_ADV_IND, _ADV_DIRECT_IND) and _UART_SERVICE_UUID in decode_services(
                adv_data
            ):
                # Found a potential device, remember it and stop scanning.
                self._addr_type = addr_type
                self._addr = bytes(
                    addr
                )  # Note: addr buffer is owned by caller so need to copy it.
                self._name = decode_name(adv_data) or "?"
                self._ble.gap_scan(None)

        elif event == _IRQ_SCAN_DONE:
            if self._scan_callback:
                if self._addr:
                    # Found a device during the scan (and the scan was explicitly stopped).
                    self._scan_callback(self._addr_type, self._addr, self._name)
                    self._scan_callback = None
                else:
                    # Scan timed out.
                    self._scan_callback(None, None, None)

        elif event == _IRQ_PERIPHERAL_CONNECT:
            # Connect successful.
            conn_handle, addr_type, addr = data
            if addr_type == self._addr_type and addr == self._addr:
                self._conn_handle = conn_handle
                self._ble.gattc_discover_services(self._conn_handle)

        elif event == _IRQ_PERIPHERAL_DISCONNECT:
            # Disconnect (either initiated by us or the remote end).
            conn_handle, _, _ = data
            if conn_handle == self._conn_handle:
                # If it was initiated by us, it'll already be reset.
                self._reset()

        elif event == _IRQ_GATTC_SERVICE_RESULT:
            # Connected device returned a service.
            conn_handle, start_handle, end_handle, uuid = data
            print("service", data)
            if conn_handle == self._conn_handle and uuid == _UART_SERVICE_UUID:
                self._start_handle, self._end_handle = start_handle, end_handle

        elif event == _IRQ_GATTC_SERVICE_DONE:
            # Service query complete.
            if self._start_handle and self._end_handle:
                self._ble.gattc_discover_characteristics(
                    self._conn_handle, self._start_handle, self._end_handle
                )
            else:
                print("Failed to find uart service.")

        elif event == _IRQ_GATTC_CHARACTERISTIC_RESULT:
            # Connected device returned a characteristic.
            conn_handle, def_handle, value_handle, properties, uuid = data
            if conn_handle == self._conn_handle and uuid == _UART_RX_CHAR_UUID:
                self._rx_handle = value_handle
            if conn_handle == self._conn_handle and uuid == _UART_TX_CHAR_UUID:
                self._tx_handle = value_handle

        elif event == _IRQ_GATTC_CHARACTERISTIC_DONE:
            # Characteristic query complete.
            if self._tx_handle is not None and self._rx_handle is not None:
                # We've finished connecting and discovering device, fire the connect callback.
                if self._conn_callback:
                    self._conn_callback()
            else:
                print("Failed to find uart rx characteristic.")

        elif event == _IRQ_GATTC_WRITE_DONE:
            conn_handle, value_handle, status = data
            print("TX complete")

        elif event == _IRQ_GATTC_NOTIFY:
            conn_handle, value_handle, notify_data = data
            if conn_handle == self._conn_handle and value_handle == self._tx_handle:
                if self._notify_callback:
                    self._notify_callback(notify_data)

    # Returns true if we've successfully connected and discovered characteristics.
    def is_connected(self):
        return (
            self._conn_handle is not None
            and self._tx_handle is not None
            and self._rx_handle is not None
        )

    # Find a device advertising the environmental sensor service.
    def scan(self, callback=None):
        self._addr_type = None
        self._addr = None
        self._scan_callback = callback
        self._ble.gap_scan(2000, 30000, 30000)

    # Connect to the specified device (otherwise use cached address from a scan).
    def connect(self, addr_type=None, addr=None, callback=None):
        self._addr_type = addr_type or self._addr_type
        self._addr = addr or self._addr
        self._conn_callback = callback
        if self._addr_type is None or self._addr is None:
            return False
        self._ble.gap_connect(self._addr_type, self._addr)
        return True

    # Disconnect from current device.
    def disconnect(self):
        if self._conn_handle is None:
            return
        self._ble.gap_disconnect(self._conn_handle)
        self._reset()

    # Send data over the UART
    def write(self, v, response=False):
        if not self.is_connected():
            return
        self._ble.gattc_write(self._conn_handle, self._rx_handle, v, 1 if response else 0)

    # Set handler for when data is received over the UART.
    def on_notify(self, callback):
        self._notify_callback = callback


def demo():
    

    not_found = False

    def on_scan(addr_type, addr, name):
        if addr_type is not None:
            print("Found peripheral:", addr_type, addr, name)
            central.connect()
        else:
            nonlocal not_found
            not_found = True
            print("No peripheral found.")

    central.scan(callback=on_scan)

    # Wait for connection...
    while not central.is_connected():
        time.sleep_ms(100)
        if not_found:
            return

    print("Connected")

    def on_rx(v):
        buf1 = bytearray(v)
        print("RX ")
        for _ in v:
            print(chr(_), end='')
        print("")

    central.on_notify(on_rx)

    #with_response = False
    with_response = True

    i = 0
    while central.is_connected():
        try:
            v = str(i) + "_"
            print("TX", v)
            central.write(v, with_response)
        except:
            print("TX failed")
        i += 1
        time.sleep_ms(2000 if with_response else 30)

    print("Disconnected")


if __name__ == "__main__":
    ble = bluetooth.BLE()
    central = BLESimpleCentral(ble)
    while(1):
        demo()
ble_Peripheral_device.py
# This example demonstrates a UART periperhal.

import bluetooth
import random
import struct
import time
from ble_advertising import advertising_payload

from micropython import const

def Temp_sensor():
    # Configure the internal temperature sensor
    sensor_temp = machine.ADC(machine.ADC.CORE_TEMP)
    conversion_factor = 3.3 / 65535
    raw_temp = sensor_temp.read_u16() * conversion_factor
    temperature = (27 - (raw_temp - 0.706) / 0.001721)
    return temperature

_IRQ_CENTRAL_CONNECT = const(1)
_IRQ_CENTRAL_DISCONNECT = const(2)
_IRQ_GATTS_WRITE = const(3)

_FLAG_READ = const(0x0002)
_FLAG_WRITE_NO_RESPONSE = const(0x0004)
_FLAG_WRITE = const(0x0008)
_FLAG_NOTIFY = const(0x0010)

_UART_UUID = bluetooth.UUID("6E400001-B5A3-F393-E0A9-E50E24DCCA9E")
_UART_TX = (
    bluetooth.UUID("6E400003-B5A3-F393-E0A9-E50E24DCCA9E"),
    _FLAG_READ | _FLAG_NOTIFY,
)
_UART_RX = (
    bluetooth.UUID("6E400002-B5A3-F393-E0A9-E50E24DCCA9E"),
    _FLAG_WRITE | _FLAG_WRITE_NO_RESPONSE,
)
_UART_SERVICE = (
    _UART_UUID,
    (_UART_TX, _UART_RX),
)


class BLESimplePeripheral:
    def __init__(self, ble, name="mpy-uart"):
        self._ble = ble
        self._ble.active(True)
        self._ble.irq(self._irq)
        ((self._handle_tx, self._handle_rx),) = self._ble.gatts_register_services((_UART_SERVICE,))
        self._connections = set()
        self._write_callback = None
        self._payload = advertising_payload(name=name, services=[_UART_UUID])
        self._advertise()

    def _irq(self, event, data):
        # Track connections so we can send notifications.
        if event == _IRQ_CENTRAL_CONNECT:
            conn_handle, _, _ = data
            print("New connection", conn_handle)
            self._connections.add(conn_handle)
        elif event == _IRQ_CENTRAL_DISCONNECT:
            conn_handle, _, _ = data
            print("Disconnected", conn_handle)
            self._connections.remove(conn_handle)
            # Start advertising again to allow a new connection.
            self._advertise()
        elif event == _IRQ_GATTS_WRITE:
            conn_handle, value_handle = data
            value = self._ble.gatts_read(value_handle)
            if value_handle == self._handle_rx and self._write_callback:
                self._write_callback(value)

    def send(self, data):
        for conn_handle in self._connections:
            self._ble.gatts_notify(conn_handle, self._handle_tx, data)

    def is_connected(self):
        return len(self._connections) > 0

    def _advertise(self, interval_us=500000):
        print("Starting advertising")
        self._ble.gap_advertise(interval_us, adv_data=self._payload)

    def on_write(self, callback):
        self._write_callback = callback


def demo():
    ble = bluetooth.BLE()
    p = BLESimplePeripheral(ble)

    def on_rx(v):
        print("RX", v)

    p.on_write(on_rx)

    i = 0
    while True:
        if p.is_connected():
            # Short burst of queued notifications.
            transmit_msg = "Temperature: "+str(Temp_sensor())
            p.send(str(transmit_msg))
            '''
            for _ in range(3):
                data = "oz"+ str(i) + "_"
                print("TX", data)
                p.send(data)
                i += 1
            '''
            i = i + 1
        time.sleep_ms(1000)


if __name__ == "__main__":
    demo()
Posted on Leave a comment

How to use Bluetooth LE of Raspberry Pi Pico W using MicroPython

Step 1: Download the MicroPython UF2 file from the link below

https://www.raspberrypi.com/documentation/microcontrollers/micropython.html

Download the UF2 file which has Wi-Fi and Bluetooth LE support.

Step 2: Put the UF2 file in your raspberry pi pico w

  1. Push and hold the BOOTSEL button and plug your Pico into the USB port of your Raspberry Pi or other computer. Release the BOOTSEL button after your Pico is connected.
  2. It will mount as a Mass Storage Device called RPI-RP2.
  3. Drag and drop the MicroPython UF2 file onto the RPI-RP2 volume. Your Pico will reboot. You are now running MicroPython.
  4. You can access the REPL via USB Serial.

Step 3: Save the following files in your raspberry pi pico w

As you can see in the image, these files should be saved on the raspberry pi pico w. As they will be imported as modules when you write your application code.

[ Click on the file names to see the complete code ]

ble_advertising.py
# Helpers for generating BLE advertising payloads.

from micropython import const
import struct
import bluetooth

# Advertising payloads are repeated packets of the following form:
#   1 byte data length (N + 1)
#   1 byte type (see constants below)
#   N bytes type-specific data

_ADV_TYPE_FLAGS = const(0x01)
_ADV_TYPE_NAME = const(0x09)
_ADV_TYPE_UUID16_COMPLETE = const(0x3)
_ADV_TYPE_UUID32_COMPLETE = const(0x5)
_ADV_TYPE_UUID128_COMPLETE = const(0x7)
_ADV_TYPE_UUID16_MORE = const(0x2)
_ADV_TYPE_UUID32_MORE = const(0x4)
_ADV_TYPE_UUID128_MORE = const(0x6)
_ADV_TYPE_APPEARANCE = const(0x19)


# Generate a payload to be passed to gap_advertise(adv_data=...).
def advertising_payload(limited_disc=False, br_edr=False, name=None, services=None, appearance=0):
    payload = bytearray()

    def _append(adv_type, value):
        nonlocal payload
        payload += struct.pack("BB", len(value) + 1, adv_type) + value

    _append(
        _ADV_TYPE_FLAGS,
        struct.pack("B", (0x01 if limited_disc else 0x02) + (0x18 if br_edr else 0x04)),
    )

    if name:
        _append(_ADV_TYPE_NAME, name)

    if services:
        for uuid in services:
            b = bytes(uuid)
            if len(b) == 2:
                _append(_ADV_TYPE_UUID16_COMPLETE, b)
            elif len(b) == 4:
                _append(_ADV_TYPE_UUID32_COMPLETE, b)
            elif len(b) == 16:
                _append(_ADV_TYPE_UUID128_COMPLETE, b)

    # See org.bluetooth.characteristic.gap.appearance.xml
    if appearance:
        _append(_ADV_TYPE_APPEARANCE, struct.pack("<h", appearance))

    return payload


def decode_field(payload, adv_type):
    i = 0
    result = []
    while i + 1 < len(payload):
        if payload[i + 1] == adv_type:
            result.append(payload[i + 2 : i + payload[i] + 1])
        i += 1 + payload[i]
    return result


def decode_name(payload):
    n = decode_field(payload, _ADV_TYPE_NAME)
    return str(n[0], "utf-8") if n else ""


def decode_services(payload):
    services = []
    for u in decode_field(payload, _ADV_TYPE_UUID16_COMPLETE):
        services.append(bluetooth.UUID(struct.unpack("<h", u)[0]))
    for u in decode_field(payload, _ADV_TYPE_UUID32_COMPLETE):
        services.append(bluetooth.UUID(struct.unpack("<d", u)[0]))
    for u in decode_field(payload, _ADV_TYPE_UUID128_COMPLETE):
        services.append(bluetooth.UUID(u))
    return services


def demo():
    payload = advertising_payload(
        name="micropython",
        services=[bluetooth.UUID(0x181A), bluetooth.UUID("6E400001-B5A3-F393-E0A9-E50E24DCCA9E")],
    )
    print(payload)
    print(decode_name(payload))
    print(decode_services(payload))


if __name__ == "__main__":
    demo()
ble_simple_peripheral.py
# This example demonstrates a UART periperhal.

import bluetooth
import random
import struct
import time
from ble_advertising import advertising_payload

from micropython import const

_IRQ_CENTRAL_CONNECT = const(1)
_IRQ_CENTRAL_DISCONNECT = const(2)
_IRQ_GATTS_WRITE = const(3)

_FLAG_READ = const(0x0002)
_FLAG_WRITE_NO_RESPONSE = const(0x0004)
_FLAG_WRITE = const(0x0008)
_FLAG_NOTIFY = const(0x0010)

_UART_UUID = bluetooth.UUID("6E400001-B5A3-F393-E0A9-E50E24DCCA9E")
_UART_TX = (
    bluetooth.UUID("6E400003-B5A3-F393-E0A9-E50E24DCCA9E"),
    _FLAG_READ | _FLAG_NOTIFY,
)
_UART_RX = (
    bluetooth.UUID("6E400002-B5A3-F393-E0A9-E50E24DCCA9E"),
    _FLAG_WRITE | _FLAG_WRITE_NO_RESPONSE,
)
_UART_SERVICE = (
    _UART_UUID,
    (_UART_TX, _UART_RX),
)


class BLESimplePeripheral:
    def __init__(self, ble, name="mpy-uart"):
        self._ble = ble
        self._ble.active(True)
        self._ble.irq(self._irq)
        ((self._handle_tx, self._handle_rx),) = self._ble.gatts_register_services((_UART_SERVICE,))
        self._connections = set()
        self._write_callback = None
        self._payload = advertising_payload(name=name, services=[_UART_UUID])
        self._advertise()

    def _irq(self, event, data):
        # Track connections so we can send notifications.
        if event == _IRQ_CENTRAL_CONNECT:
            conn_handle, _, _ = data
            print("New connection", conn_handle)
            self._connections.add(conn_handle)
        elif event == _IRQ_CENTRAL_DISCONNECT:
            conn_handle, _, _ = data
            print("Disconnected", conn_handle)
            self._connections.remove(conn_handle)
            # Start advertising again to allow a new connection.
            self._advertise()
        elif event == _IRQ_GATTS_WRITE:
            conn_handle, value_handle = data
            value = self._ble.gatts_read(value_handle)
            if value_handle == self._handle_rx and self._write_callback:
                self._write_callback(value)

    def send(self, data):
        for conn_handle in self._connections:
            self._ble.gatts_notify(conn_handle, self._handle_tx, data)

    def is_connected(self):
        return len(self._connections) > 0

    def _advertise(self, interval_us=500000):
        print("Starting advertising")
        self._ble.gap_advertise(interval_us, adv_data=self._payload)

    def on_write(self, callback):
        self._write_callback = callback


def demo():
    ble = bluetooth.BLE()
    p = BLESimplePeripheral(ble)

    def on_rx(v):
        print("RX", v)

    p.on_write(on_rx)

    i = 0
    while True:
        if p.is_connected():
            # Short burst of queued notifications.
            for _ in range(3):
                data = str(i) + "_"
                print("TX", data)
                p.send(data)
                i += 1
        time.sleep_ms(100)


if __name__ == "__main__":
    demo()

Step 4: Create a simple Bluetooth UART Code

which receives the message “Toggle\r\n” and Toggle the onboard LED and sends the state of the led back to the user.

# Import necessary modules
from machine import Pin 
import bluetooth
from ble_simple_peripheral import BLESimplePeripheral

# Create a Bluetooth Low Energy (BLE) object
ble = bluetooth.BLE()

# Create an instance of the BLESimplePeripheral class with the BLE object
sp = BLESimplePeripheral(ble)

# Create a Pin object for the onboard LED, configure it as an output
led = Pin("LED", Pin.OUT)

# Initialize the LED state to 0 (off)
led_state = 0
xWR_flag = 0
# Define a callback function to handle received data
def on_rx(data):
    print("Data received: ", data)  # Print the received data
    global led_state,xWR_flag  # Access the global variable led_state
    if data == b'toggle\r\n':  # Check if the received data is "toggle"
        led.value(not led_state)  # Toggle the LED state (on/off)
        led_state = 1 - led_state  # Update the LED state
        xWR_flag = 1

# Start an infinite loop
while True:
    if sp.is_connected():  # Check if a BLE connection is established
        sp.on_write(on_rx)  # Set the callback function for data reception
        if xWR_flag == 1:            
            # Create a message string                
            msg="LED STATE: "
            # Send the message via BLE
            sp.send(msg)
            sp.send(str(led_state))
            sp.send(str("\r\n"))
            xWR_flag = 0


Posted on Leave a comment

How to use bipolar stepper motor using l298n module and raspberry pi pico w

The stepper motor that i have is a bipolar stepper motor.

On it one side there is information about it.

TYPE: 17PM-k310-33VS
NO.   T4508-03
    Minebea-Matsushita
    Motor Corporation
     Made in Thailand

It is a NEMA 17
17 stands for 1.7inches

Raspberry Pi Pico WL298N Module
GNDGND
GP0IN1
GP1IN2
GP2IN3
GP3IN4

The two coils pair are found using the multimeter in resistance mode.

Since I am using a regular motor driver. I cannot do the micro stepping.
But even with micro stepping, it can do a lot of stuff.

So there are two coil pair.
step angle of 1.8o degrees.

So to make a 360o
we need 360o / 1.8o = 200 steps

So we can make a full rotation with 200 steps of 1.8 degrees each.
This is what is known as the full step.
In full step, we only excite 1 pole at a time. There are two poles per coil.

We can excite two poles at a time. Which will half the step angle to 0.9 degrees.
The following is the table I have made to see how many steps I will be made by employing a 0.9 deg angle. It is only up to 300 steps or 270 deg. You can calculate from then on.

Micropython Code

from machine import Pin
import utime
motor_pins = [Pin(0, Pin.OUT), Pin(1, Pin.OUT), Pin(2, Pin.OUT), Pin(3, Pin.OUT)]
step_sequence = [
    [1,0,0,0],#1
    [1,0,1,0],#13
    [0,0,1,0],#3
    [0,1,1,0],#23
    [0,1,0,0],#2
    [0,1,0,1],#24
    [0,0,0,1],#4
    [1,0,0,1]#41  
]
off_seq = [(0,0,0,0)]
length_step_sequence = len(step_sequence)
one_rotation_length = 400/length_step_sequence
step_delay = (1/1000)*10 #ms
def step_off():
    #print("step off")
    motor_pins[0].value(0)
    motor_pins[1].value(0)
    motor_pins[2].value(0)
    motor_pins[3].value(0)
    utime.sleep(step_delay)
'''
Function Name: move_step
Description:
It takes the step sequence and assigns the motor pins to the value
according to the step sequence.
It moves one step seqence at a time.
For a half step sequence
each step will be 0.9 degrees.
For a full step sequence
each step will be 1.8 degrees.
'''
def move_step(seq):
    ygh = seq
    #print(ygh)
    for step1,pins in zip(ygh,motor_pins):
        pins.value(step1)
'''
Function Name: move one step
Description:
It moves all the steps in the sequence.
For a half wave steps => 8 * 0.9 = 7.2 deg
For a full wave steps => 4 * 1.8 = 7.2 deg
'''
def move_one_step(forward,reverse):
    for i in range(0,length_step_sequence,1):
        if forward == 1:
            move_step((step_sequence[i]))
        elif reverse == 1:
            move_step(reversed(step_sequence[i]))
        utime.sleep(step_delay)
def rotation(steps,forward,reverse):
    
    if forward == 1:
        for i in range(steps):
            move_one_step(1,0)
            print("Forward steps: ",steps)
    elif reverse == 1:
        for i in range(steps):
            move_one_step(0,1)
            print("Reverse steps: ",steps)
    
        #step_off()

'''
Half step calculations
8 Steps of 0.9 deg each.
total degree of 8 steps => 8 * 0.9 = 7.2
(8 step sequence) * (50 repeated steps) * 0.9 deg = 360
So, a total of 400 steps are required to make 360 degree.
7.2 deg x (50 repeated steps) = 360 degrees
7.2 deg x 25 = 180 degree
'''
while True:
    rotation(25,1,0) # move 180 forward(CW) 
    utime.sleep(1)
    rotation(50,0,1) # move 366 reverse (CCW)
    utime.sleep(1)
Posted on Leave a comment

12V PC Fan Control Using Raspberry Pi Pico W By PWM

How to control a 12V PC fan using Pulse Width Modulation (PWM) signals with the Raspberry Pi Pico W board and an L298N motor driver module. I will use the MicroPython programming language and the Thonny IDE to write and run the code.

Raspberry Pi Pico WL298n Module
GP9IN1
GNDGND
VSYS
(Connect this only when you save as “main.py” in raspberry pi.)
+5V
12V PC FANL298n Module
Positive Lead(+12V wire)OUT1
Negative Lead OUT2

Micropython Code

import network
import socket
import time
from time import sleep
from picozero import pico_temp_sensor, pico_led
import machine

ssid = 'Abhay'
password = 'AK26@#36'

wdt = machine.WDT(timeout=5000)  # Timeout in milliseconds (e.g., 5000ms = 5 seconds)
def feed_watchdog(timer):
    wdt.feed()  # Feed the watchdog timer to reset the countdown

timerWdt = machine.Timer()
timerWdt.init(period=1000, mode=machine.Timer.PERIODIC, callback=feed_watchdog)

GPIO_PIN_9 = machine.Pin(9)
pwm9 = machine.PWM(GPIO_PIN_9)
pwm9.freq(25000)
    
current_pwm_duty = 0
sleep_duration = 0.01
def updateFan(x,y):
    global current_pwm_duty,sleep_duration
    current_pwm_duty = x
    
    if sleep_duration > 0 and sleep_duration <= 2:
        sleep_duration = y
    else:
        sleep_duration = 0.01

def fanon(timer):
    global current_pwm_duty,sleep_duration
    pwm9.duty_u16(current_pwm_duty)
    time.sleep(sleep_duration)
    pwm9.duty_u16(0)
    
def fanoff():
    pwm9.duty_u16(0)

timerUpdate = machine.Timer()
timerUpdate.init(period=2000, mode=machine.Timer.PERIODIC, callback=fanon)
def connect():
    #Connect to WLAN
    wlan = network.WLAN(network.STA_IF)
    wlan.active(True)
    wlan.connect(ssid, password)
    while wlan.isconnected() == False:
        print('Waiting for connection...')
        sleep(1)
    ip = wlan.ifconfig()[0]
    print(f'Connected on {ip}')
    return ip

def open_socket(ip):
    # Open a socket
    address = (ip, 80)
    connection = socket.socket()
    connection.bind(address)
    connection.listen(1)
    return connection

def webpage(temperature, state,user_value):
    #Template HTML
    
    html = f"""
            <!DOCTYPE html>
<html>
<head>
    <meta name="viewport" content="width=device-width, initial-scale=1.0">
</head>
<body>
    <form action="./lighton" style="display: flex; justify-content: center;">
        <input type="submit" value="Light on" style="font-size: 40px;" />
    </form>
    <form action="./lightoff" style="display: flex; justify-content: center;">
        <input type="submit" value="Light off" style="font-size: 40px;" />
    </form>
    <p style="font-size: 20px;">LED is {state}</p>
    <p style="font-size: 20px;">Temperature is {temperature}</p>
    
    
    <form action="./fanon_LOW" style="display: flex; justify-content: center;">
        <input type="submit" value="FAN on LOW" style="font-size: 40px;" />
    </form>
     <form action="./fanon_MID" style="display: flex; justify-content: center;">
        <input type="submit" value="FAN on MID" style="font-size: 40px;" />
    </form>
    <form action="./fanon_FULL" style="display: flex; justify-content: center;">
        <input type="submit" value="FAN off FULL" style="font-size: 40px;" />
    </form>
    <form action="./fanoff" style="display: flex; justify-content: center;">
        <input type="submit" value="FAN off" style="font-size: 40px;" />
    </form>
    
    <h1>Numeric Form</h1>
    <form method=POST action="/usrval">
        <label for="value">Enter a numeric value:</label><br>
        <input type="number" id="value" name="value" min="30" max="65" value="30"required><br><br>
        <input type="submit" value="Submit">
    </form>
    <p>User value: {user_value}</p>  <!-- Display the user-submitted value -->
</body>
</html>


            """
    return str(html)
def serve(connection):
    #Start a web server
    state = 'OFF'
    pico_led.off()
    temperature = 0
    user_value = None  # Variable to store the user-submitted value
    usr_int = 0
    while True:
        client = connection.accept()[0]
        request = client.recv(1024)
        request = str(request)
        rqst1 = request.split()
        '''
        for x1 in rqst1:
            if(x1.find("usrval") != -1):
                print(rqst1)
                #print(x1)
        #print(rqstfind)
        '''
        try:
            
            for x1 in rqst1:
                if "value=" in x1:
                    user_value = x1.split("=")[2].strip("'")
                    usr_int = int(user_value) * 1000
                    if usr_int >= 65535:
                        usr_int = 65535
                    if usr_int <= 0:
                        usr_int = 0
                    print(user_value," ",type(user_value)," int:",usr_int," ",type(usr_int))


        except:
            pass
        
        try:
            request = request.split()[1]
        except IndexError:
            pass
        if request == '/lighton?':
            pico_led.on()
            state = 'ON'
        elif request =='/lightoff?':
            pico_led.off()
            state = 'OFF'
        elif request == '/fanon_LOW?':
            #put the usr value in the pwm duty
            updateFan(30000,1.75)
        elif request == '/fanon_MID?':
            #put the usr value in the pwm duty
            updateFan(45000,1.5)
        elif request == '/fanon_FULL?':
            #put the usr value in the pwm duty
            updateFan(65000,1.6) 
        elif request == '/fanoff?':
            updateFan(0,1)
        
          
        temperature = pico_temp_sensor.temp
        html = webpage(temperature, state,user_value)
        client.send(html)
        client.close()

try:
    ip = connect()
    connection = open_socket(ip)
    serve(connection)
except KeyboardInterrupt:
    machine.reset()
Posted on Leave a comment

Wireless Plant Watering System using Raspberry Pi Pico W

Every morning my mom waters the plant. She has to water them every day and sometimes in summer, she must provide water twice a day.

In winter plant needs water when necessary.

Solution:

For the above problem, I developed this project using raspberry pi pico w.

Here is what it does:

  1. It connects to the WiFi router. The wifi router allocates a fixed IP address. For that, I created a new entry in the DHCP bindings of the router.
  2. When you visit the IP address 192.168.1.101
  3. It samples the soil moisture sensor through the ADC. And display an HTML page that shows the status of ADC and the onboard LED.
  4. The HTML page also has a button for turning on the pump.
    I have kept it manual.
  5. When the PUMP ON button is pressed the water pump is turned ON. The water pump is connected via the L298n module. Which is controlled by a PWM signal of 1Khz frequency. The duty cycle is slowly increased to 75%.
    There is a timeout of 10 Seconds. If the timeout is reached the water pump will be turned off.

Schematic Diagram

Schematic Diagram

Micropython Code

import network
import socket
import time
from time import sleep
from picozero import pico_temp_sensor, pico_led
import machine

ssid = 'Abhay'
password = 'AK26@#36'
'''
# Pin GP9 (physical pin 5) on PicoZero
GPIO_PIN = 9

# Set up the GPIO pin as an output
pin9 = machine.Pin(GPIO_PIN, machine.Pin.OUT)

# Turn off the GPIO pin
pin9.off()
'''
GPIO_PIN_9 = machine.Pin(9)
pwm9 = machine.PWM(GPIO_PIN_9)

    
def ADC():
    adc = machine.ADC(0)  # Initialize ADC on pin A0
    sensor_value = adc.read_u16()  # Read the analog value from the sensor
    # Add your code to process and display the sensor value as per your requirements
    #print(sensor_value)
    #time.sleep_ms(500)  # Delay between readings (adjust as needed)
    #sensor_value = 18756
    percentage = 100 - ((sensor_value / 65535) * 100)
    #print(f"sensor_value: {sensor_value} percentage: {percentage}")
    return sensor_value,percentage
    
    
def gen_pwm(duration, timeout):
    # Set PWM frequency
    pwm9.freq(1000)  # Set frequency to 1 kHz

    start_time = time.ticks_ms()  # Get the initial timestamp
    pump_started = False

    while time.ticks_diff(time.ticks_ms(), start_time) < timeout:
        # Check water level using ADC
        ADC_Read = ADC()
        water_level = ADC_Read[1]
        #adc.read()

        if not pump_started and water_level < 50:
            # Start the pump by gradually increasing the duty cycle
            for duty in range(0, 32767, 100):
                pwm9.duty_u16(duty)
                time.sleep_ms(duration)  # Adjust the delay as needed for smooth transition
                ADC_Read = ADC()
                water_level = ADC_Read[1]
                
                if water_level >=50 :
                    break
            pump_started = True

        if water_level >= 50 or pump_started and water_level <= 0:
            # Stop the pump by setting the duty cycle to 0
            pwm9.duty_u16(0)
            break

    # Stop the PWM signal
    pwm9.duty_u16(0)

def connect():
    #Connect to WLAN
    wlan = network.WLAN(network.STA_IF)
    wlan.active(True)
    wlan.connect(ssid, password)
    while wlan.isconnected() == False:
        print('Waiting for connection...')
        sleep(1)
    ip = wlan.ifconfig()[0]
    print(f'Connected on {ip}')
    return ip

def open_socket(ip):
    # Open a socket
    address = (ip, 80)
    connection = socket.socket()
    connection.bind(address)
    connection.listen(1)
    return connection

def webpage(temperature, state,user_value):
    #Template HTML
    ADC_Value = ADC()
    html = f"""
            <!DOCTYPE html>
<html>
<head>
    <meta name="viewport" content="width=device-width, initial-scale=1.0">
</head>
<body>
    <form action="./lighton" style="display: flex; justify-content: center;">
        <input type="submit" value="Light on" style="font-size: 40px;" />
    </form>
    <form action="./lightoff" style="display: flex; justify-content: center;">
        <input type="submit" value="Light off" style="font-size: 40px;" />
    </form>
    <p style="font-size: 20px;">LED is {state}</p>
    <p style="font-size: 20px;">Temperature is {temperature}</p>
    <p style="font-size: 20px;">ADC Value is {ADC_Value[0]}</p>
    <p style="font-size: 20px;">ADC % is {ADC_Value[1]}</p>
    
    <form action="./pumpon" style="display: flex; justify-content: center;">
        <input type="submit" value="Pump on" style="font-size: 40px;" />
    </form>
    <form action="./pumpoff" style="display: flex; justify-content: center;">
        <input type="submit" value="Pump off" style="font-size: 40px;" />
    </form>
    
    <h1>Numeric Form</h1>
    <form method=POST action="/usrval">
        <label for="value">Enter a numeric value:</label><br>
        <input type="number" id="value" name="value" required><br><br>
        <input type="submit" value="Submit">
    </form>
    <p>User value: {user_value}</p>  <!-- Display the user-submitted value -->
</body>
</html>


            """
    return str(html)
def serve(connection):
    #Start a web server
    state = 'OFF'
    pico_led.off()
    temperature = 0
    user_value = None  # Variable to store the user-submitted value
    while True:
        client = connection.accept()[0]
        request = client.recv(1024)
        request = str(request)
        rqst1 = request.split()
        '''
        for x1 in rqst1:
            if(x1.find("usrval") != -1):
                print(rqst1)
                #print(x1)
        #print(rqstfind)
        '''
        try:
            
            for x1 in rqst1:
                if "value=" in x1:
                    user_value = x1.split("=")[2].strip("'")
                    print(user_value)
        except:
            pass
        
        try:
            request = request.split()[1]
        except IndexError:
            pass
        if request == '/lighton?':
            pico_led.on()
            state = 'ON'
        elif request =='/lightoff?':
            pico_led.off()
            state = 'OFF'
        elif request =='/pumpon?':
            #pin9.on()
            gen_pwm(10,10000)
            print("\n\n"+request)
            #state = 'OFF'
        elif request =='/pumpoff?':
            #pin9.off()
            print("Pump OFF")
        elif request == '/usrval':
          #  print("\n\n"+request)
            index = request.find('value=')
            
            if index != -1:
                end_index = request.find(' ', index)
                if end_index == -1:
                    end_index = len(request)
                user_value = request[index + len('value='):end_index]
                print(f"\n\nValue: \t {user_value}\n\n")
        temperature = pico_temp_sensor.temp
        html = webpage(temperature, state,user_value)
        client.send(html)
        client.close()

try:
    ip = connect()
    connection = open_socket(ip)
    serve(connection)
except KeyboardInterrupt:
    machine.reset()
Posted on Leave a comment

How to setup C/C++ SDK of Raspberry Pi Pico W On Raspberry Pi Model 3b+

The C/C++ SDK has development tools for both development boards.

There are various methods of the SDK. You can use this in Windows, MAC etc.
But the easiest and simplest method is the use of Raspberry Pi itself.

Step 1: Follow Chapter 1 of the Getting Started with Raspberry Pi Pico https://datasheets.raspberrypi.com/pico/getting-started-with-pico.pdf

Step 2: Follow Chapter 8: Creating your own project
copy the files from pico W folder, which you will find under the pico-examples folder. The blink project will be under the wifi folder.

Step 3: add the following line to your CMakeLists.text file

set(PICO_BOARD pico_w)

Sample CMakeLists.text

cmake_minimum_required(VERSION 3.13)
include(pico_sdk_import.cmake)
project(test_project C CXX ASM)
set(CMAKE_C_STANDARD 11)
set(CMAKE_CXX_STANDARD 17)
set(PICO_BOARD pico_w)
pico_sdk_init()
add_executable(test
test.c
)
pico_enable_stdio_usb(test 1)
pico_enable_stdio_uart(test 0)
pico_add_extra_outputs(test)

target_link_libraries(test 
					pico_stdlib
					pico_cyw43_arch_none
					)

NOTE: you can set the pico board to pico w. when you issue cmake ..
Only use one method of setting the pico w board.

cmake -DPICO_BOARD=pico_w ..
Posted on Leave a comment

How to blink onboard LED on Raspberry Pi Pico W using Thonny IDE in Windows

The raspberry pi pico w has a LED on it.
This LED is not connected to the GPIO pins of RP2040 microcontroller directly.

As you can see in the image of the pinout taken from the official datasheet.
The onboard LED is connected to a pin ‘WL_GPIO0’.
WL_GPIO0 is an internal pin.

There are different ways to program the pico W.
The easiest method is to install thonny IDE. And install micropython on the pico w.

Download Thonny IDE

After you have installed thonny. Now connect you raspberry pi pico w board to the computer USB port while holding the onboard BOOTSEL button. Then follow the steps shown in the following images.

After you have done the above steps. You now have to install a MicroPython library.

picozero is a MicroPython library which has functions for Wifi and other RP2040 chip.

To complete the projects in this path, you need to install the picozero library as a Thonny package.

In Thonny, choose Tools > Manage packages.

Code

import machine
import time

# create a Pin object to control the LED on pin 'WL_GPIO0'
led_pin = machine.Pin('WL_GPIO0', machine.Pin.OUT)

# enter an infinite loop
while True:
    # set the LED pin to a high (on) state
    led_pin.value(1)
    # pause the program for one second
    time.sleep(1)
    # set the LED pin to a low (off) state
    led_pin.value(0)
    # pause the program for one second
    time.sleep(1)

In this program, we first import the machine module and the time module. The machine module provides access to hardware-level features on the Raspberry Pi Pico, while the time module provides functions for time-related operations.

Next, we create a Pin object called led_pin to control the LED connected to the pin labeled ‘WL_GPIO0’. The machine.Pin() function is used to create the led_pin object, with the first argument specifying the pin label and the second argument specifying that the pin is an output pin, i.e. we can set its state to high or low.

Then, we enter an infinite loop using the while True: statement. Within the loop, we use the value() method of the led_pin object to set the state of the LED pin to high (on) or low (off), with a one second delay between each state change using the time.sleep() function.

Comments are added to explain each line of code and make it easier to understand the purpose and function of the program.

Posted on Leave a comment

Raspberry Pi Pico W

Raspberry Pi Pico W Datasheet
Connecting to the Internet with Raspberry Pi Pico W
RP2040 Datasheet

NOTE: The CYW43439 supports both 802.11 wireless and Bluetooth, initially Pico W does not have Bluetooth support. Support may be added later, and will use the same SPI interface. If support is added existing hardware may require a firmware update to support Bluetooth, but there will be no hardware modifications needed.

Technical Specification
  • RP2040 microcontroller with 2MB of flash memory
  • On-board single-band 2.4GHz wireless interfaces (802.11n)
  • Micro USB B port for power and data (and for reprogramming the flash)
  • 40-pin 21mm×51mm ‘DIP’ style 1mm thick PCB with 0.1″ through-hole pins also with edge castellations
    • Exposes 26 multi-function 3.3V general purpose I/O (GPIO)
    • 23 GPIO are digital-only, with three also being ADC capable
    • Can be surface-mounted as a module
  • 3-pin Arm serial wire debug (SWD) port
  • Simple yet highly flexible power supply architecture
    • Various options for easily powering the unit from micro USB, external supplies or batteries
  • High quality, low cost, high availability
  • Comprehensive SDK, software examples and documentation
  • Dual-core cortex M0+ at up to 133MHz
  • 264kB multi-bank high performance SRAM
  • External Quad-SPI flash with eXecute In Place (XIP) and 16kB on-chip cache
  • High performance full-crossbar bus fabric
  • On-board USB1.1 (device or host)
  • 30 multi-function general purpose I/O (four can be used for ADC)
    • 1.8-3.3V I/O voltage
  • 12-bit 500ksps analogue to digital converter (ADC)
  • Various digital peripherals
    • 2 × UART, 2 × I2C, 2 × SPI, 16 × PWM channels
    • 1 × timer with 4 alarms, 1 × real time clock
  • 2 × programmable I/O (PIO) blocks, 8 state machines in total
    • Flexible, user-programmable high-speed I/O
    • Can emulate interfaces such as SD card and VGA

Schematic Diagram

Raspberry Pi Pico W Schematic 2
Raspberry Pi Pico W Schematic component Location
Raspberry Pi Pico W Schematic 1

Raspberry Pi Pico W Pinout